qemux/qemu
QEMU in a Docker container.
100K+
qemux/qemu repository overview
QEMU


Docker container for running virtual machines using QEMU.
Features ✨
- Runs virtual machines inside a Docker container
- Supports almost every disk and image format
- Web-based viewer for controlling the VM
- Near-native performance with KVM acceleration
- Customizable CPU, memory, and storage allocation
- Dynamic memory allocation with memory ballooning
- USB passthrough and host folder sharing
- Supports NAT, user-mode, macvlan, and macvtap networking
- Automatic downloads for popular Linux distributions
Usage 🐳
Docker Compose:
services:
  qemu:
    image: qemux/qemu
    container_name: qemu
    environment:
      BOOT: "mint"
    devices:
      - /dev/kvm
      - /dev/net/tun
    cap_add:
      - NET_ADMIN
    ports:
      - 8006:8006
    volumes:
      - ./qemu:/storage
    restart: always
    stop_grace_period: 2m
Docker CLI:
docker run -it --rm --name qemu -e "BOOT=mint" -p 8006:8006 --device=/dev/kvm --device=/dev/net/tun --cap-add NET_ADMIN -v "${PWD:-.}/qemu:/storage" --stop-timeout 120 docker.io/qemux/qemu
Kubernetes:
kubectl apply -f https://raw.githubusercontent.com/qemus/qemu/refs/heads/master/kubernetes.yml
GitHub Codespaces:

Requirements ⚙️
- Docker or Podman on a Linux host with KVM support.
- Docker Desktop or Podman (Desktop) on Windows 11 with nested virtualization enabled.
- At least 2 GB of available RAM.
- At least 64 GB of free disk space.
Note
Docker Desktop on Linux, macOS, and Windows 10 does not currently provide KVM access to containers and is therefore not supported.
FAQ 💬
How do I use it?
Very simple! These are the steps:
-
Set the
BOOTvariable to the operating system you want to install. -
Start the container and connect to port 8006 using your web browser.
-
Complete the installation using the web-based viewer.
Enjoy your brand new machine, and don't forget to star this repo!
How do I select the operating system?
You can use the BOOT environment variable in order to specify the operating system that will be downloaded:
environment:
  BOOT: "mint"
Select from the values below:
| Value | Operating System | Size |
|---|---|---|
alma | Alma Linux | 2.2 GB |
alpine | Alpine Linux | 60 MB |
arch | Arch Linux | 1.2 GB |
cachy | CachyOS | 2.6 GB |
centos | CentOS | 7.0 GB |
debian | Debian | 3.3 GB |
fedora | Fedora | 2.3 GB |
gentoo | Gentoo | 3.6 GB |
kali | Kali Linux | 3.8 GB |
kubuntu | Kubuntu | 4.4 GB |
mint | Linux Mint | 2.8 GB |
manjaro | Manjaro | 4.1 GB |
mx | MX Linux | 2.2 GB |
nixos | NixOS | 2.4 GB |
suse | OpenSUSE | 1.0 GB |
rocky | Rocky Linux | 2.1 GB |
slack | Slackware | 3.7 GB |
tails | Tails | 1.5 GB |
ubuntu | Ubuntu Desktop | 6.0 GB |
ubuntus | Ubuntu Server | 3.0 GB |
xubuntu | Xubuntu | 4.0 GB |
zima | ZimaOS | 1.4 GB |
zorin | Zorin OS | 3.8 GB |
How can I use my own image?
If you want to download an operating system that is not in the list above, you can set the BOOT variable to the URL of the image:
environment:
  BOOT: "https://dl-cdn.alpinelinux.org/alpine/v3.19/releases/x86_64/alpine-virt-3.19.1-x86_64.iso"
The BOOT URL accepts files in any of the following formats:
| Extension | Format |
|---|---|
.img | Raw |
.raw | Raw |
.iso | Optical |
.qcow2 | QEMU |
.vmdk | VMware |
.vhd | VirtualPC |
.vhdx | Hyper-V |
.vdi | VirtualBox |
It will also accept files such as .img.gz, .qcow2.xz, .iso.zip and many more, because it will automatically extract compressed files.
Alternatively you can use a local image file directly, by binding it in your compose file:
volumes:
  - ./example.iso:/boot.iso
This way you can supply either a /boot.iso, /boot.img or a /boot.qcow2 file. The value of BOOT will be ignored in this case.
How do I change the storage location?
To change the storage location, include the following bind mount in your compose file:
volumes:
  - ./qemu:/storage
Replace the example path ./qemu with the desired storage folder or named volume.
How do I change the size of the disk?
To expand the default size of 64 GB, add the DISK_SIZE setting to your compose file and set it to your preferred capacity:
environment:
  DISK_SIZE: "128G"
Tip
This can also be used to resize an existing disk to a larger capacity without any data loss. However, you will need to manually extend the disk partition afterwards inside your OS, since the added disk space will appear as unallocated.
How do I change the amount of CPU or RAM?
By default, the VM will be allowed to use 2 CPU cores and 2 GB of RAM.
If you want to adjust this, you can specify the desired amount using the following environment variables:
environment:
  RAM_SIZE: "8G"
  CPU_CORES: "4"
How do I share files with the host?
To share files with the host, first ensure that your guest OS has 9pfs support compiled in or available as a kernel module. If so, add the following volume to your compose file:
volumes:
  - ./example:/shared
Then start the container and execute the following command in the guest:
mount -t 9p -o trans=virtio shared /mnt/example
Now the ./example directory on the host will be available as /mnt/example in the guest.
How do I enable audio?
Audio is disabled by default. To stream it to the browser, add the following environment variable:
environment:
  AUDIO: "Y"
Then enable Audio under Settings → Advanced in the web viewer. The stream is only active while this option is enabled, so it uses no extra bandwidth otherwise.
How do I boot ARM64 images?
You can use the qemu-arm container to run ARM64-based images.
How do I boot Windows?
Use dockur/windows instead, as it includes all the drivers required during installation, amongst many other features.
How do I boot macOS?
Use dockur/macos instead, as it uses all the right settings and automatically downloads the installation files.
How do I boot without UEFI?
By default, the machine will boot with UEFI enabled. If your OS does not support that, you can boot with a legacy BIOS:
environment:
  BOOT_MODE: "legacy"
How do I boot without VirtIO drivers?
By default, the machine makes use of virtio-scsi drives for performance reasons, and even though most Linux kernels bundle the necessary driver for this device, that may not always be the case for other operating systems.
If your machine fails to detect the hard drive, you can modify your compose file to use virtio-blk instead:
environment:
  DISK_TYPE: "blk"
If it still fails to boot, you can set the value to ide to emulate a IDE drive, which is relatively slow but requires no drivers and is compatible with almost every system.
How do I expose network ports?
When using bridge networking, you can expose ports by adding them to your compose file. If you want to be able to connect to the SSH service of the machine for example, you would add it like this:
ports:
  - 2222:22
This will make port 2222 on your host redirect to port 22 of the virtual machine.
When using user-mode networking (for example when running under Podman), you will also need to add those ports to the USER_PORTS variable like this:
environment:
  USER_PORTS: "22,80,443"
How do I assign an individual IP address to the container?
By default, the container uses bridge networking, which shares the IP address with the host.
If you want to assign an individual IP address to the container, you can create a macvlan network as follows:
docker network create -d macvlan \
    --subnet=192.168.0.0/24 \
    --gateway=192.168.0.1 \
    --ip-range=192.168.0.100/28 \
    -o parent=eth0 vlan
Be sure to modify these values to match your local subnet.
Once you have created the network, change your compose file to look as follows:
services:
  qemu:
    container_name: qemu
    ..<snip>..
    networks:
      vlan:
        ipv4_address: 192.168.0.100

networks:
  vlan:
    external: true
An added benefit of this approach is that you won't have to perform any port mapping anymore, since all ports will be exposed by default.
Important
This IP address won't be accessible from the Docker host due to the design of macvlan, which doesn't permit communication between the two. If this is a concern, you need to create a [second macvlan](https://blog.oddbit.com/post/2018-03-12-using-docker-macvlan-networks/#host-access) as a workaround.
How can the VM acquire an IP address from my router?
After configuring the container for macvlan, it is possible for the VM to become part of your home network by requesting an IP from your router, just like a real PC.
To enable this mode, in which the container and the VM will have separate IP addresses, add the following lines to your compose file:
environment:
  DHCP: "Y"
devices:
  - /dev/vhost-net
device_cgroup_rules:
  - 'c *:* rwm'
How do I add multiple disks?
To create additional disks, modify your compose file like this:
environment:
  DISK2_SIZE: "32G"
  DISK3_SIZE: "64G"
volumes:
  - ./example2:/storage2
  - ./example3:/storage3
How do I pass through a disk?
You can pass through disk devices or partitions directly by adding them to your compose file in this way:
devices:
  - /dev/sdb:/disk1
  - /dev/sdc1:/disk2
Use /disk1 if you want it to become your main drive, and use /disk2 and higher to add them as secondary drives.
How do I pass through a USB device?
To pass through a USB device, first look up its vendor and product IDs via the lsusb command, then add them to your compose file like this:
environment:
  ARGUMENTS: "-device usb-host,vendorid=0x1234,productid=0x1234"
devices:
  - /dev/bus/usb
How do I enable dynamic memory allocation?
By default, the VM is allocated the full amount of RAM configured via RAM_SIZE for its entire lifetime.
However, you can enable memory ballooning if you want the container to dynamically reclaim unused guest RAM based on host memory pressure.
How can I provide custom arguments to QEMU?
You can create the ARGUMENTS environment variable to provide additional arguments to QEMU at runtime:
environment:
  ARGUMENTS: "-device usb-tablet"
If you want to see the full command-line arguments used, you can set:
environment:
  DEBUG: "Y"
Are these all available options?
No. For a complete overview of all supported settings, see the environment variables page.
How do I verify that KVM is available?
First, make sure your platform and container runtime meet the requirements listed above.
On a Linux host, install cpu-checker and run:
sudo apt install cpu-checker
sudo kvm-ok
A working configuration should report:
KVM acceleration can be used
You can also verify that the KVM device exists:
ls -l /dev/kvm
If KVM is unavailable, check whether:
- Hardware virtualization (
Intel VT-xorAMD-V) is enabled in your BIOS or UEFI. - Nested virtualization is enabled when the host itself is a virtual machine.
- Your VPS or cloud provider supports nested virtualization.
If kvm-ok succeeds but the container still reports that KVM is unavailable, you can temporarily add privileged: true to your Compose file to rule out a permission or device-access issue.
How do I run Proxmox as a container?
If you prefer a web-based management interface, or some advanced features that this container may not offer, you can try out dockur/proxmox.
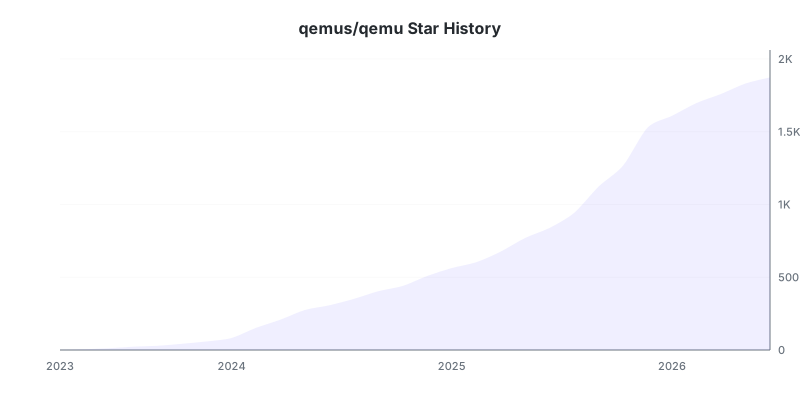
Stars 🌟
Tag summary
Content type
Image
Digest
sha256:32d50e646…
Size
116.8 MB
Last updated
about 11 hours ago
docker pull qemux/qemuThis week's pulls
Pulls:
8,072
Last week