netizensoc/gvm-scanner
The docker container is based on the latest version of Greenbone Vulnerability Management & OpenVAS
4.5K
netizensoc/gvm-scanner repository overview

Visit our Website: https://www.netizen.net
Greenbone Vulnerability Manager/Scanner
Latest Version: 26.7.0


Warning
PLEASE DO NOT CHANGE THE TIMEZONE INSIDE THE GREENBONE SECURITY MANAGER. There is a known issue with GSA when changing time zones, which causes a GMP authentication error. If you change your time zone, you will either need to modify the PostgreSQL database or stand up a new container/volume and remove the old one.
The docker container is based on the latest version of Greenbone Vulnerability Management and OpenVAS. Netizen continues to make improvements to the software for the stability and functionality of the suite. This container supports AMD 64-bit and ARM 64-bit Linux-based operating systems and Docker Desktop for Windows using WSL 2. If upgrading from a previous version of GVM 21.04.x or older, or PostgreSQL version 13 or older, you must follow the PostgreSQL upgrade instructions. Taking a backup of your containers or VM before continuing in case of data corruption during the upgrade is recommended.
A remote scanner can be found by visiting our Openvas-Docker Github Repo.
Table of Contents
- Linux Installation Instructions
- Windows Installation Instruction
- Upgrade Instructions
- PostgreSQL Upgrade Instructions
- Architecture
- Docker Tags
- Estimated Hardware Requirements
- About
Installation Instructions
Docker System Installation (Linux AMD/ARM 64-bit Only)
- Install the required packages, docker, and docker-compose on your Linux system.
sudo apt update
sudo apt install -y apt-transport-https ca-certificates curl software-properties-common docker.io docker-compose-v2
- Create a directory and download the docker-compose.yml file from GitHub. ${USER} is the username of the user(s).
mkdir -p /home/$USER/gvm-docker
cd /home/$USER/gvm-docker
wget https://raw.githubusercontent.com/NetizenCorp/GVM-Docker/main/docker-compose.yml
- Modify the docker-compose.yml file using your preferred editor (Nano or Vim).
nano docker-compose.yml
- Edit the yml file with your preferences. NOTE: Netizen is not responsible for any breach if the user fails to change the default username and passwords. Make sure to store your passwords in a secure password manager.
services:
    gvm:
		image: netizensoc/gvm-scanner:[latest|dev|dev-arm|old-stable] # PICK A VERSION AND REMOVE BRACKETS BEFORE COMPOSING. Latest is the stable image for both AMD64 & ARM64 Architecture. Dev is the development un-stable image on AMD64 Platforms.
																	  # Dev-Arm is the development un-stable image on ARM64 Platforms. Old Stable is the previous stable image.
        volumes:
          - gvm-data:/data              # DO NOT MODIFY unless establishing the external docker drive
        environment:
          - USERNAME="admin"            # You can leave the username as admin or change to whatever you like
          - PASSWORD="admin"            # Please use 15+ Characters consisting of numbers, lower & uppercase letters, and a special character.
          - HTTPS=true                  # DO NOT MODIFY
          - TZ="ETC"                    # Change to your corresponding timezone
          - SSHD=true                   # Mark true if using a Remote Scanner. Mark false if using a standalone operation.
          - DB_PASSWORD="dbpassword"    # Run the following command to generate "openssl rand -hex 40"
        ports:
          - "443:9392"  # Web interface
          - "5432:5432" # Access PostgreSQL database from external tools
          - "2222:22"   # SSH for remote sensors. You can comment the line out with the # if you don't plan on using remote scanners.
          # - "9390:9390" # For GVM API Access. Leave commented if you do not plan on using the API for external web application access.
        restart: unless-stopped # Remove if your using for penetration testing or one-time scans. Only use if using for production/continuous scanning
		hostname: ospd-openvas.local
        cap_add:
          - NET_ADMIN # for capturing packages in promiscuous mode
          - NET_RAW # for raw sockets e.g. used for the boreas alive detection
        security_opt:
          - seccomp=unconfined
          - apparmor=unconfined
        logging:
          driver: "json-file"
          options:
            max-size: "1k"
            max-file: "3"
volumes:
    gvm-data:
- Next, it's time to stand up the docker image using docker-compose.
sudo docker compose up -d # The -d option is for a detached docker image
It will take time for the container to be ready as it compiles the NVTs, CVE, CERTS, and SCAP data. To monitor this activity use the docker logs command.
sudo docker container ls # Lists the current containers running on the system. Look under the Names column for the container name. Ex: gvm-docker_gvm_1
sudo docker logs -f [container name] # Example: docker logs -f gvm-docker_gvm_1
- After completing everything, go to https://[Host IP Address]/ to access the scanner. Use the credentials you provided in the yml file.
Docker System Installation (Windows WSL2 AMD 64-bit Only)
-
Install Docker Desktop for Windows and the required packages for docker, docker-compose, and WSL 2 on your Windows system. You can download the application at https://www.docker.com/products/docker-desktop/
-
Follow the usual installation instructions to install Docker Desktop. Depending on which version of Windows you are using, Docker Desktop may prompt you to turn on WSL 2 during installation. Read the information displayed on the screen and turn on the WSL 2 feature to continue.
-
After installing Docker Desktop and before activating WSL2, you must create a .wslconfig file under your C:\Users<Username>\ directory or modify the existing file with the text below. Please configure the file based on your system specs or VM requirements.
# Settings apply across all Linux distros running on WSL 2
[wsl2]

# Limits VM memory to use no more than 4 GB, this can be set as whole numbers using GB or MB
memory=4GB

# Sets the VM to use two virtual processors
processors=2

# Network Setting
networkingMode=mirrored

# Specify a custom Linux kernel to use with your installed distros. The default kernel used can be found at https://github.com/microsoft/WSL2-Linux-Kernel
# kernel=C:\\temp\\myCustomKernel

# Sets additional kernel parameters, in this case enabling older Linux base images such as Centos 6
# kernelCommandLine = vsyscall=emulate

# Sets amount of swap storage space to 8GB, default is 25% of available RAM
swap=8GB

# Sets swapfile path location, default is %USERPROFILE%\AppData\Local\Temp\swap.vhdx
swapfile=C:\\temp\\wsl-swap.vhdx

# Disable page reporting so WSL retains all allocated memory claimed from Windows and releases none back when free
pageReporting=false

# Turn on default connection to bind WSL 2 localhost to Windows localhost. Setting is ignored when networkingMode=mirrored
localhostforwarding=true

# Disables nested virtualization
nestedVirtualization=false

# Turns on output console showing contents of dmesg when opening a WSL 2 distro for debugging
debugConsole=true

# Enable experimental features
[experimental]
sparseVhd=true
-
Start Docker Desktop from the Windows Start menu.
-
Navigate to Settings.
-
From the General tab, select Use WSL 2 based engine..
-
If you have installed Docker Desktop on a system that supports WSL 2, this option is turned on by default.
-
Select Apply & Restart.
-
Create a directory under your Documents folder and name it whatever you like.
-
Navigate to https://github.com/NetizenCorp/GVM-Docker/blob/main/docker-compose.yml and download the docker-compose.yml raw file from GitHub. After downloading it, copy it into the directory you created in the Documents folder.
-
Next, you will modify the docker-compose.yml file using your preferred editor (NotePad, NotePad++, etc).
Edit and save the yml file with your preferences. NOTE: Netizen is not responsible for any breach if the user fails to change the default username and passwords. Make sure to store your passwords in a secure password manager.
services:
    gvm:
        image: netizensoc/gvm-scanner:[latest|dev|dev-arm|old-stable] # PICK A VERSION AND REMOVE BRACKETS BEFORE COMPOSING. Latest is the stable image for both AMD64 & ARM64 Architecture. Dev is the development un-stable image on AMD64 Platforms.
																	  # Dev-Arm is the development un-stable image on ARM64 Platforms. Old Stable is the previous stable image.
        volumes:
          - gvm-data:/data              # DO NOT MODIFY unless establishing the external docker drive
        environment:
          - USERNAME="admin"            # You can leave the username as admin or change to whatever you like
          - PASSWORD="admin"            # Please use 15+ Characters consisting of numbers, lower & uppercase letters, and a special character.
          - HTTPS=true                  # DO NOT MODIFY
          - TZ="ETC"                    # Change to your corresponding timezone
          - SSHD=true                   # Mark true if using a Remote Scanner. Mark false if using a standalone operation.
          - DB_PASSWORD="dbpassword"    # Run the following command to generate "openssl rand -hex 40"
        ports:
          - "443:9392"  # Web interface
          - "5432:5432" # Access PostgreSQL database from external tools
          - "2222:22"   # SSH for remote sensors. You can comment the line out with the # if you don't plan on using remote scanners.
          # - "9390:9390" # For GVM API Access. Leave commented if you do not plan on using the API for external web application access.
        restart: unless-stopped # Remove if your using for penetration testing or one-time scans. Only use if using for production/continuous scanning
		hostname: ospd-openvas.local
        cap_add:
          - NET_ADMIN # for capturing packages in promiscuous mode
          - NET_RAW # for raw sockets e.g. used for the boreas alive detection
        security_opt:
          - seccomp=unconfined
          - apparmor=unconfined
        logging:
          driver: "json-file"
          options:
            max-size: "1k"
            max-file: "3"
volumes:
    gvm-data:
- It's time to stand up the docker image using docker-compose. Open your command prompt, navigate to the directory with the docker-compose.yml file, and type the following to create/execute the image.
docker compose up -d # The -d option is for a detached docker image
- If successful, you should see everything created in Docker Desktop. The container will take time to be ready as it compiles the NVTs, CVE, CERTS, and SCAP data. To monitor this activity, use the Docker Desktop logs under your newly created container.
After completing everything, go to https://[Host IP Address]/ to access the scanner. Use the credentials you provided in the yml file.
Upgrade Instructions (REMINDER: Always backup or take a snapshot of your data before executing the upgrade.)
- If you are using external/remote scanners and want to maintain connectivity, run the following commands to backup the sockets and authorized keys. If you are not using remote scanners (just using the default built-in scanners), skip step 1 and step 2.
sudo docker exec -it [container name] bash
mkdir /data/sockets/
cp -R /sockets/* /data/sockets/
cp /var/lib/gvm/.ssh/authorized_keys /data
- Verify that all the data exists and matches between locations. Once verified, exit the container.
- Stop the container without deleting it
sudo docker-compose stop
OR (if using docker compose V2)
sudo docker compose stop
- Once Stopped, make a backup of your docker-compose.yml file and then pull the latest docker compose YAML file and update with your credentials from the backup file with your preferred editor.
cp docker-compose.yml docker-compose.yml.bk
wget https://raw.githubusercontent.com/NetizenCorp/GVM-Docker/main/docker-compose.yml
nano docker-compose.yml
- Once stopped, pull the latest image of GVM
sudo docker pull netizensoc/gvm-scanner:latest
- For those updating from versions prior to 23.2.1, you will need to modify the YAML file to make the drive external. This will preserve the drive and prevent accidental deletion. You will need to get the name of the volume and modify the name of the volume in the YAML file. If you are upgrading from version 23.2.1 or later, you can skip to step 9.
sudo docker volume ls
- Copy the volume name that is outputted and put it into the YAML file in each location the volume is referenced
DRIVER    VOLUME NAME
local     gvm-data
- Open the YAML file to add the following configuration and update all volume names with the name that was copied. Verify everything is correct and pointing to the correct volume before executing.
### Update this section at the bottom of the file. Also update the volume name at the top of the file.
volumes:
    gvm-data:
	name: gvm-data  # ADD THIS LINE
	external: true  # ADD THIS LINE
- Next, stand up the docker container to update the image. If you need to restore remote scanner sockets and the authorized key file, go to steps 10 & 11.
sudo docker compose up -d
- Remote scanner connectivity restoration: Once the image is fully up and running (pulled NVT updates and everything), copy the authorized key file and sockets back into their original locations.
sudo docker exec -it [container name] bash
cp -R /data/sockets/*  /sockets/
cp /data/authorized_keys  /var/lib/gvm/.ssh/authorized_keys
- Once copied, verify you have connectivity by clicking the Shield under the Scanners page. Note if unable to connect you may need to reboot the master scanner and remote scanner images.
PostgreSQL Upgrade
If you upgrade from a previous major version of PostgreSQL 13 or under, you must upgrade your database before installation. The instructions below will guide you through the upgrade by backing up your database, recreating the docker image, and restoring the backup. The new version of GVM uses Postgres version 14. Please follow the steps below.
- Log into the terminal Linux Box hosting the GVM scanner and then type the following commands
sudo docker exec -it [container name] bash
pg_dump -U postgres -d gvmd --role gvm -n public --blobs --format=c -f "dumpfile.sql"
exit
sudo docker container ls
- Copy the container ID of the GVM scanner to use for the docker copy
sudo docker cp [Container ID]:/dumpfile.sql ~/dumpfile.sql
sudo docker container stop [Container name]
sudo docker container rm [Container name] #This will remove the container
sudo docker volume ls #This will list the previous volume used for that docker image
sudo docker volume rm [Volume name] #This will delete the old volume.
sudo docker image ls #This is to find the name of the image and remove the old version
sudo docker image rm [image name]
sudo docker-compose up -d
- After starting up the docker image, wait for it to load all GVM configs, NVT, SCAP, and CERT data before restoring the database. Use the docker logs command to monitor the progress. To restore the database file run the following commands:
sudo docker container ls #This is to get the new container ID of the docker image
sudo docker cp /dumpfile.sql [Container ID]:/
sudo docker exec -it [container name] bash
pg_restore -U gvm -d gvmd -c dumpfile.sql
After executing that command, wait for the restore function to restore all the information. After restoration, restart the docker container and then log in to verify that your data has been restored.
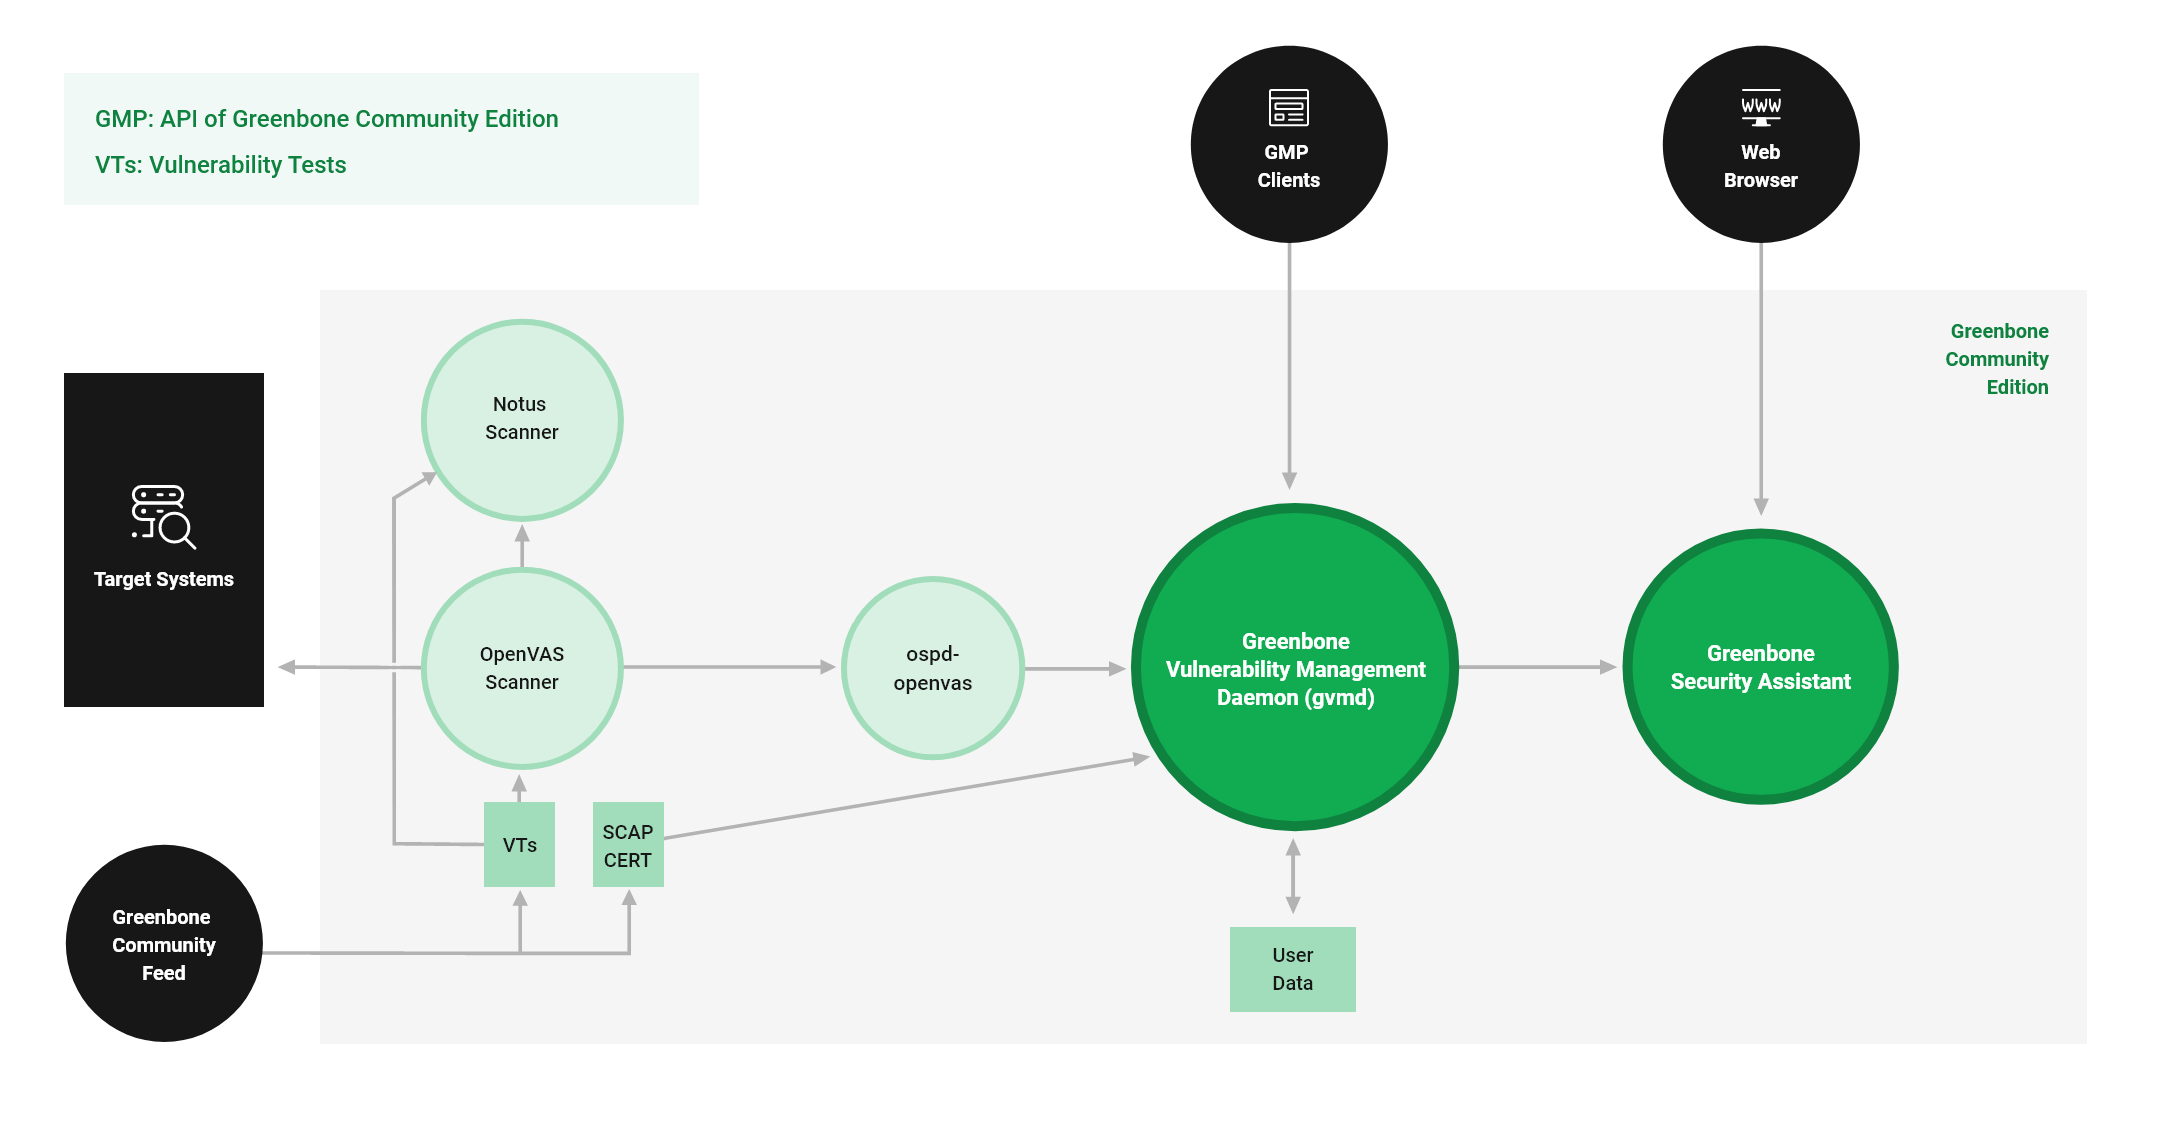
Architecture
The key points from the diagram below are how our setup establishes a connection with the remote scanner and the available ports on the GMV-Docker container. You can still use any add-on tools with OpenVAS on port 9390. One of the latest/best upgrades allows you to connect directly to Postgres using your favorite database tool.
Docker Tags
| Tag | Description |
|---|---|
| latest | Latest stable version of both AMD64 and ARM64 |
| dev | Latest development build of AMD64 version |
| dev-arm | Latest development build ARM64 version |
| old-stable | Previous stable version of GVM |
Estimated Hardware Requirements
| Hosts | CPU Cores | Memory | Disk Space |
|---|---|---|---|
| 512 active IPs | 4@2GHz cores | 8 GB RAM | 100 GB |
| 2,500 active IPs | 6@2GHz cores | 12 GB RAM | 200 GB |
| 10,000 active IPs | 8@3GHz cores | 16 GB RAM | 500 GB |
| 25,000 active IPs | 16@3GHz cores | 32 GB RAM | 1 TB |
| 100,000 active IPs | 32@3GHz cores | 64 GB RAM | 2 TB |
About
Any Issues or Suggestions for the Project can be communicated via the issues. Thanks.
Tag summary
Content type
Image
Digest
sha256:20cbdb553…
Size
2.1 GB
Last updated
6 months ago
docker pull netizensoc/gvm-scanner