bitnamicharts/chainloop
Bitnami Helm chart for Chainloop
1M+
bitnamicharts/chainloop repository overview
Bitnami Secure Images Helm chart for Chainloop
Chainloop is an open-source Software Supply Chain control plane, a single source of truth for metadata and artifacts, plus a declarative attestation process.
Trademarks: This software listing is packaged by Bitnami. The respective trademarks mentioned in the offering are owned by the respective companies, and use of them does not imply any affiliation or endorsement.
TL;DR
helm install my-release oci://REGISTRY_NAME/REPOSITORY_NAME/chainloop
Note: You need to substitute the placeholders
REGISTRY_NAMEandREPOSITORY_NAMEwith a reference to your Helm chart registry and repository.
Introduction
This chart bootstraps a Chainloop deployment on a Kubernetes cluster using the Helm package manager.
Before you begin
- Kubernetes 1.23+
- Helm 3.2.0+
- PV provisioner support in the underlying infrastructure (If built-in PostgreSQL is enabled)
Compatibility with the following Ingress Controllers has been verified, other controllers might or might not work.
Installing the Chart
This chart comes in two flavors, standard and development.
Standard (default)
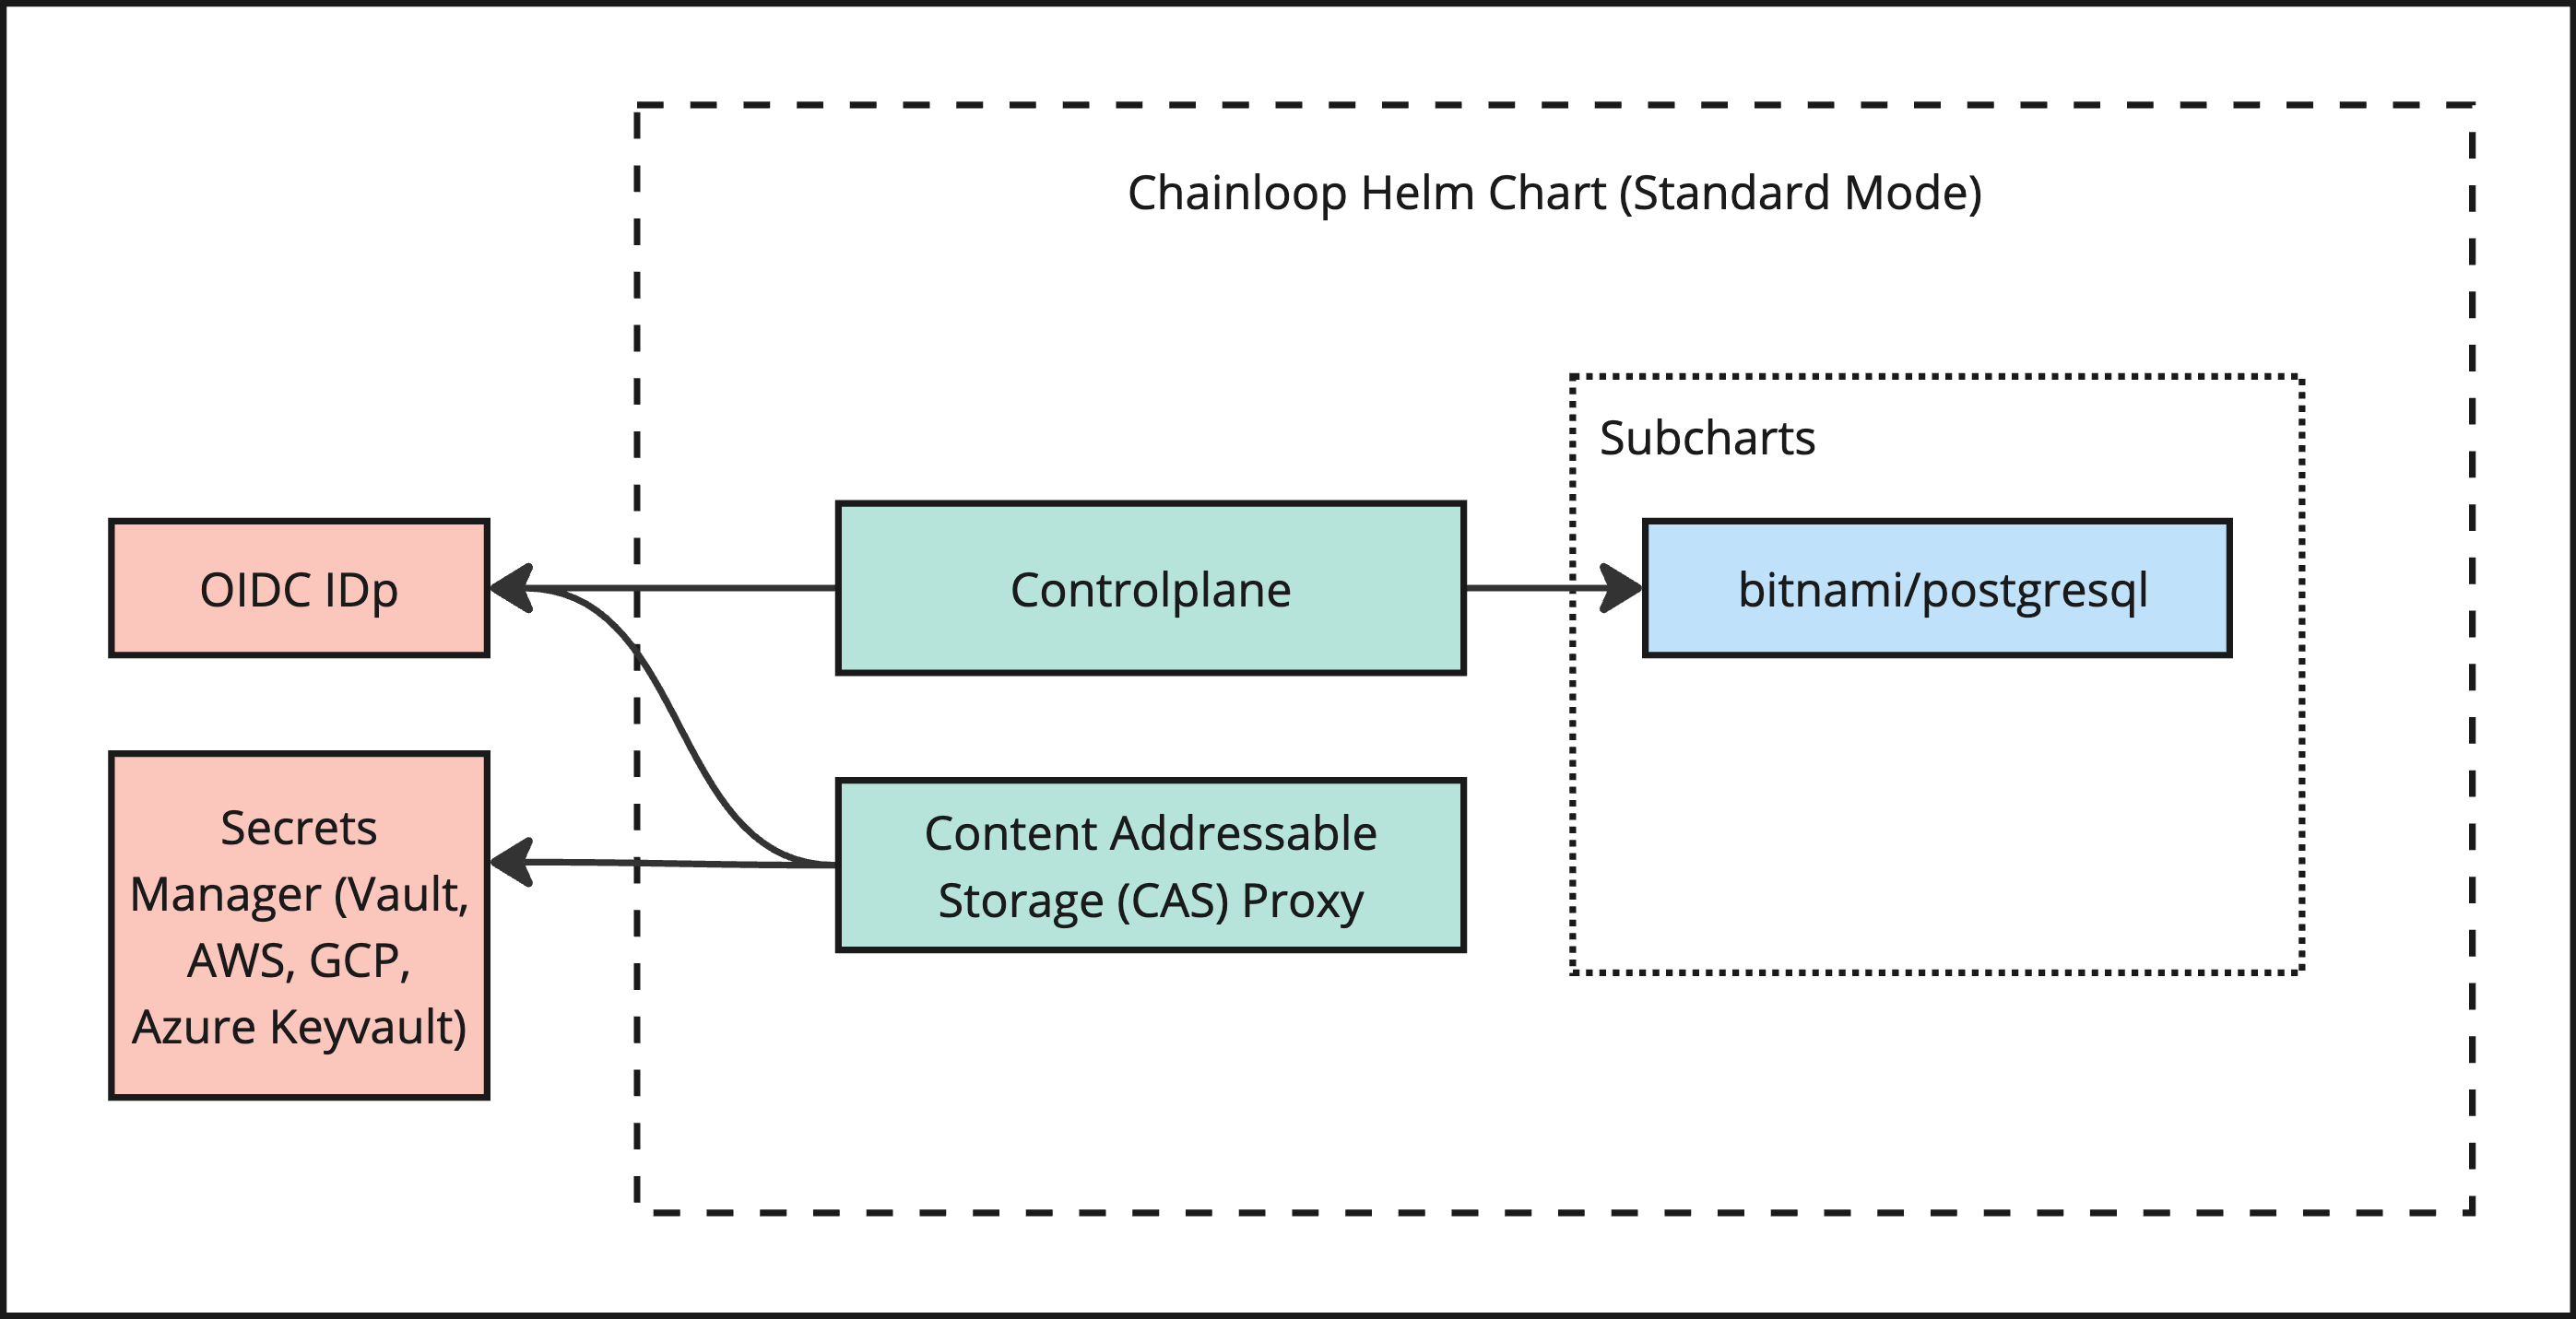
The default deployment mode relies on external dependencies to be available in advance.
The Helm Chart in this mode includes
- Chainloop Controlplane
- Chainloop Artifact proxy
- A PostgreSQL dependency enabled by default
During installation, you'll need to provide
- Open ID Connect Identity Provider (IDp) settings i.e Auth0 settings
- Connection settings for a secrets storage backend, either Hashicorp Vault or AWS Secrets Manager
- ECDSA (ES512) key-pair used for Controlplane to CAS Authentication
Instructions on how to create the ECDSA keypair can be found here.
Installation examples for standard mode
NOTE: We do not recommend passing nor storing sensitive data in plain text. For production, please consider having your overrides encrypted with tools such as Sops, Helm Secrets or Sealed Secrets.
Deploy Chainloop configured to talk to the bundled PostgreSQL an external OIDC IDp and a Vault instance.
helm install [RELEASE_NAME] oci://REGISTRY_NAME/REPOSITORY_NAME/chainloop \
    # Open ID Connect (OIDC)
    --set controlplane.auth.oidc.url=[OIDC URL] \
    --set controlplane.auth.oidc.clientID=[clientID] \
    --set controlplane.auth.oidc.clientSecret=[clientSecret] \
    # Secrets backend
    --set secretsBackend.vault.address="https://[vault address]:8200" \
    --set secretsBackend.vault.token=[token] \
    # Server Auth KeyPair
    --set casJWTPrivateKey="$(cat private.ec.key)" \
    --set casJWTPublicKey="$(cat public.pem)"
Deploy using AWS Secrets Manager instead of Vault
helm install [RELEASE_NAME] oci://REGISTRY_NAME/REPOSITORY_NAME/chainloop \
    # Open ID Connect (OIDC)
    # ...
    # Secrets backend
    --set secretsBackend.backend=awsSecretManager \
    --set secretsBackend.awsSecretManager.accessKey=[AWS ACCESS KEY ID] \
    --set secretsBackend.awsSecretManager.secretKey=[AWS SECRET KEY] \
    --set secretsBackend.awsSecretManager.region=[AWS region]\
    # Server Auth KeyPair
    # ...
or using GCP Secret Manager
helm install [RELEASE_NAME] oci://REGISTRY_NAME/REPOSITORY_NAME/chainloop \
    # Open ID Connect (OIDC)
    # ...
    # Secrets backend
    --set secretsBackend.backend=gcpSecretManager \
    --set secretsBackend.gcpSecretManager.projectId=[GCP Project ID] \
    --set secretsBackend.gcpSecretManager.serviceAccountKey=[GCP Auth KEY] \
    # Server Auth KeyPair
    # ...
or Azure KeyVault
helm install [RELEASE_NAME] oci://REGISTRY_NAME/REPOSITORY_NAME/chainloop \
    # Open ID Connect (OIDC)
    # ...
    # Secrets backend
    --set secretsBackend.backend=azureKeyVault \
    --set secretsBackend.azureKeyVault.tenantID=[AD tenant ID] \
    --set secretsBackend.azureKeyVault.clientID=[Service Principal ID] \
    --set secretsBackend.azureKeyVault.clientSecret=[Service Principal secret] \
    --set secretsBackend.azureKeyVault.vaultURI=[Azure KeyVault URI]
    # Server Auth KeyPair
    # ...
Connect to an external PostgreSQL database instead
helm install [RELEASE_NAME] oci://REGISTRY_NAME/REPOSITORY_NAME/chainloop \
    # Open ID Connect (OIDC)
    # ...
    # Secrets backend
    # ...
    # Server Auth KeyPair
    # ...
    # External DB setup
    --set postgresql.enabled=false \
    --set controlplane.externalDatabase.host=[DB_HOST] \
    --set controlplane.externalDatabase.user=[DB_USER] \
    --set controlplane.externalDatabase.password=[DB_PASSWORD] \
    --set controlplane.externalDatabase.database=[DB_NAME]
Development
To provide an easy way to give Chainloop a try, this Helm Chart has an opt-in development mode that can be enabled with the flag development=true
IMPORTANT: DO NOT USE THIS MODE IN PRODUCTION
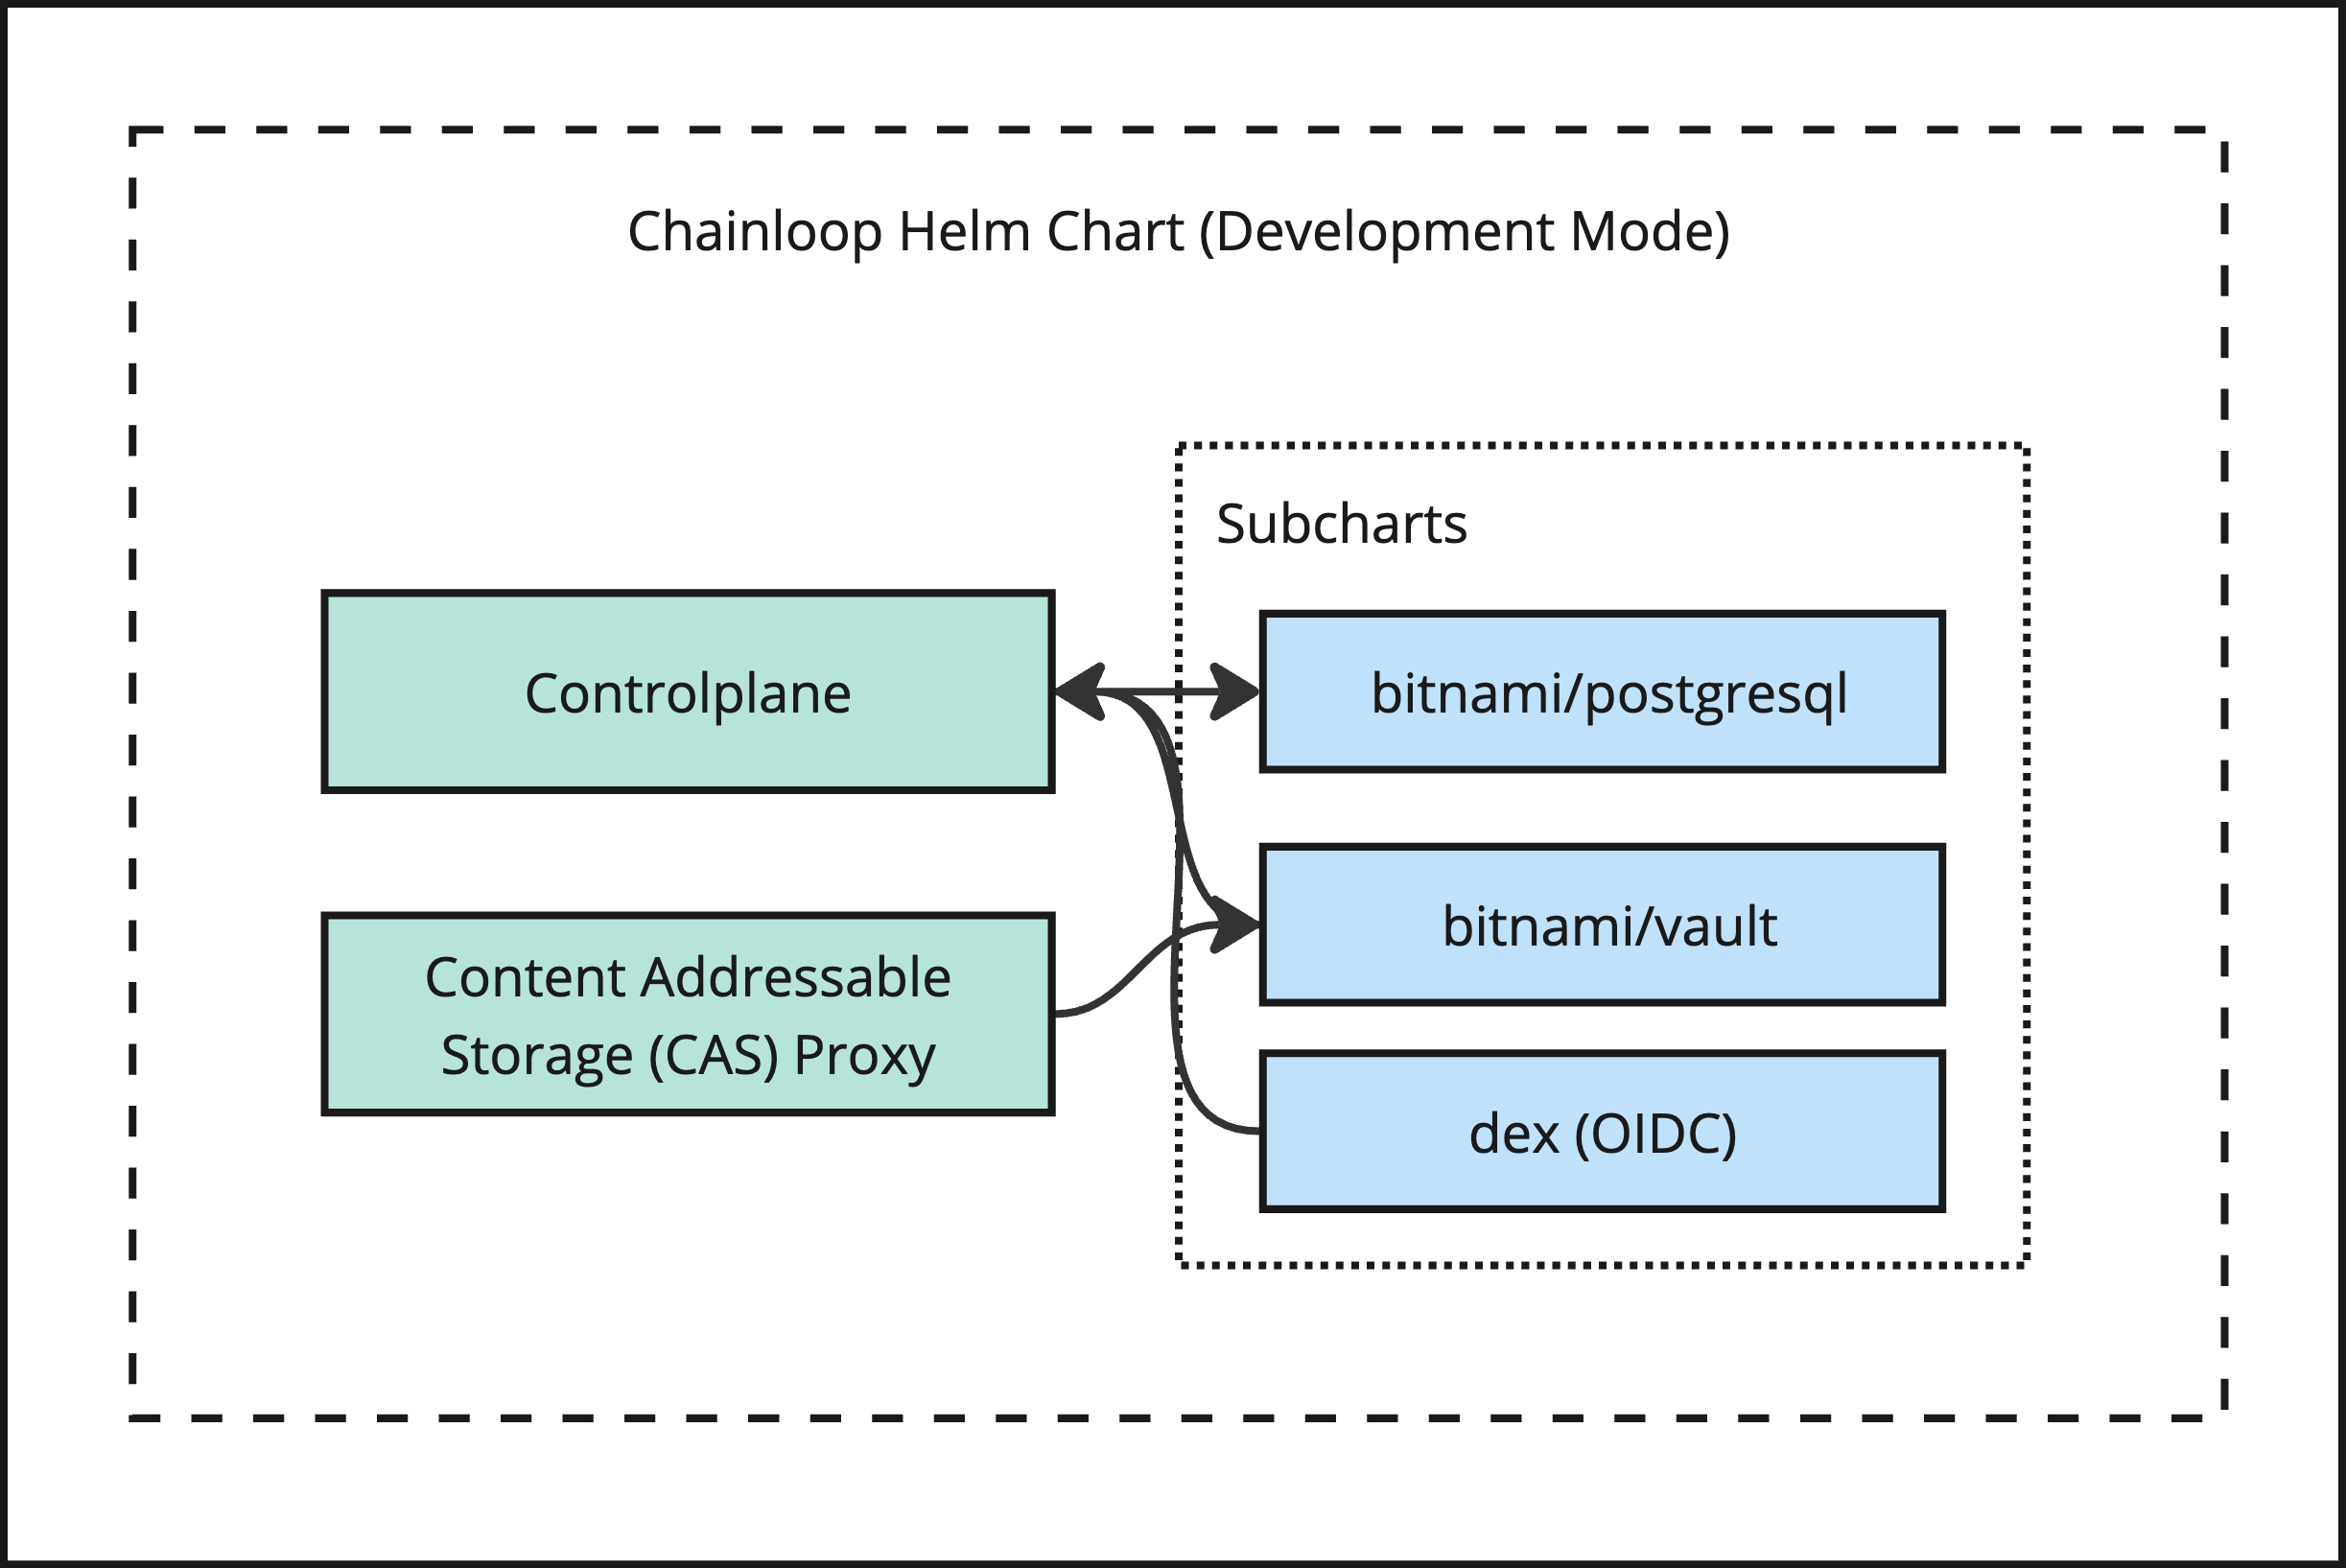
The Helm Chart in this mode includes
- Chainloop Controlplane
- Chainloop Artifact proxy
- A PostgreSQL dependency enabled by default
- A pre-configured Hashicorp Vault instance running in development mode (unsealed, in-memory, insecure)
- A pre-configured Dex OIDC instance.
The pre-setup users configuration on the Chart include two users, the information is as follows:
username: [email protected]
password: password

username: [email protected]
password: password
The overall OIDC configuration can be found at the values.yaml file.
CAUTION: Do not use this mode in production, for that, use the standard mode instead.
Installation examples for development mode
Deploy by leveraging built-in Vault and PostgreSQL instances
helm install [RELEASE_NAME] oci://REGISTRY_NAME/REPOSITORY_NAME/chainloop --set development=true
AirGap and Relocation Support
This chart is compatible with relocation processes performed by the Helm Relocation Plugin
This is a two-step process (wrap -> unwrap)
- Pull all the container images and Helm chart and wrap them in an intermediate tarball.
- Unwrap the tarball and push container images, update the Helm Chart with new image references and push it to the target registry.
For example: to relocate to an Azure Container Registry
helm dt wrap oci://REGISTRY_NAME/REPOSITORY_NAME/chainloop
# 🎉  Helm chart wrapped into "chainloop-1.77.0.wrap.tgz"

# Now you can take the tarball to an air-gapped environment and unwrap it like this
helm dt unwrap chainloop-1.77.0.wrap.tgz oci://chainloop.azurecr.io --yes
#  Unwrapping Helm chart "chainloop-1.77.0.wrap.tgz"
#    ✔  All images pushed successfully
#    ✔  Helm chart successfully pushed
#
# 🎉  Helm chart unwrapped successfully: You can use it now by running "helm install oci://chainloop.azurecr.io/chart/chainloop --generate-name"
How to guides
CAS upload speeds are slow, what can I do?
Chainloop uses gRPC streaming to perform artifact uploads. This method is susceptible to being very slow on high latency scenarios. #375
To improve upload speeds, you need to increase http2 flow control buffer. This can be done in NGINX by setting the following annotation in the ingress resource.
# Improve upload speed by adding client buffering used by http2 control-flows
nginx.ingress.kubernetes.io/client-body-buffer-size: "3M"
Note: For other reverse proxies, you'll need to find the equivalent configuration.
Generate a ECDSA key-pair
An ECDSA key-pair is required to perform authentication between the control-plane and the Artifact CAS
You can generate both the private and public keys by running
# Private Key (private.ec.key)
openssl ecparam -name secp521r1 -genkey -noout -out private.ec.key
# Public Key (public.pem)
openssl ec -in private.ec.key -pubout -out public.pem
Then, you can either provide it in a custom values.yaml file override
casJWTPrivateKey: |-
  -----BEGIN EC PRIVATE KEY-----
  REDACTED
  -----END EC PRIVATE KEY-----
casJWTPublicKey: |
  -----BEGIN PUBLIC KEY-----
  REDACTED
  -----END PUBLIC KEY-----
or as shown before, provide them as imperative inputs during Helm Install/Upgrade --set casJWTPrivateKey="$(cat private.ec.key)"--set casJWTPublicKey="$(cat public.pem)"
Enable a custom domain with TLS
Chainloop uses three endpoints so we'll need to enable the ingress resource for each one of them.
See below an example of a values.yaml override
controlplane:
  ingress:
    enabled: true
    hostname: cp.chainloop.dev

  ingressAPI:
    enabled: true
    hostname: api.cp.chainloop.dev

cas:
  ingressAPI:
  enabled: true
  hostname: api.cas.chainloop.dev
A complete setup that uses
- NGINX as ingress Controller
- cert-manager as TLS provider
would look like
controlplane:
  ingress:
    enabled: true
    tls: true
    ingressClassName: nginx
    hostname: cp.chainloop.dev
    annotations:
      # This depends on your configured issuer
      cert-manager.io/cluster-issuer: "letsencrypt-prod"

  ingressAPI:
    enabled: true
    tls: true
    ingressClassName: nginx
    hostname: api.cp.chainloop.dev
    annotations:
      nginx.ingress.kubernetes.io/backend-protocol: "GRPC"
      cert-manager.io/cluster-issuer: "letsencrypt-prod"

cas:
  ingressAPI:
    enabled: true
    tls: true
    ingressClassName: nginx
    hostname: api.cas.chainloop.dev
    annotations:
      nginx.ingress.kubernetes.io/backend-protocol: "GRPC"
      cert-manager.io/cluster-issuer: "letsencrypt-prod"
      # limit the size of the files that go through the proxy
      # 0 means to not check the size of the request so we do not get 413 error.
      # For now we are going to set a limit on 100MB files
      # Even though we send data in chunks of 1MB, this size refers to all the data sent in the streaming connection
      nginx.ingress.kubernetes.io/proxy-body-size: "100m"
Remember, once you have set up your domain, make sure you use the CLI pointing to it instead of the defaults.
Connect to an external PostgreSQL database
# Disable built-in DB
postgresql:
  enabled: false

# Provide with external connection
controlplane:
  externalDatabase:
    host: 1.2.3.4
    port: 5432
    user: chainloop
    password: [REDACTED]
    database: chainloop-controlplane-prod
Alternatively, if you are using Google Cloud SQL and you are running Chainloop in Google Kubernetes Engine. You can connect instead via a proxy
This method can also be easily enabled in this chart by doing
# Disable built-in DB
postgresql:
  enabled: false

# Provide with external connection
controlplane:
  sqlProxy:
    # Inject the proxy sidecar
    enabled: true
    ## @param controlplane.sqlProxy.connectionName Google Cloud SQL connection name
    connectionName: "my-sql-instance"
  # Then you'll need to configure your DB settings to use the proxy IP address
  externalDatabase:
    host: [proxy-sidecar-ip-address]
    port: 5432
    user: chainloop
    password: [REDACTED]
    database: chainloop-controlplane-prod
Use AWS secrets manager
Instead of using Hashicorp Vault (default), you can use AWS Secrets Manager by adding these settings in your values.yaml file
secretsBackend:
  backend: awsSecretManager
  awsSecretManager:
    accessKey: [KEY]
    secretKey: [SECRET]
    region: [REGION]
Use GCP secret manager
Or Google Cloud Secret Manager with the following settings
secretsBackend:
  backend: gcpSecretManager
  gcpSecretManager:
    projectId: [PROJECT_ID]
    serviceAccountKey: [KEY]
Use Azure KeyVault
Azure KeyVault is also supported
secretsBackend:
  backend: azureKeyVault
  azureKeyVault:
    tenantID: [TENANT_ID] # Active Directory Tenant ID
    clientID: [CLIENT_ID] # Registered application / service principal client ID
    clientSecret: [CLIENT_SECRET] # Service principal client secret
    vaultURI: [VAULT URI] # Azure Key Vault URL
Deploy in keyless mode with file-based CA
This feature is experimental, as it doesn't yet support verification.
You can enable keyless signing mode by providing a custom Certificate Authority. For example, these commands generate a self-signed certificate with an RSA private key of length 4096 and AES256 encryption with a validity of 365 days:
> openssl genrsa -aes256 -out ca.key 4096
...
> openssl req -new -x509 -sha256 -key ca.key -out ca.crt -days 365
...
Then you can configure your deployment values with:
controlplane:
  keylessSigning:
    enabled: true
    backend: fileCA
    fileCA:
      cert: |
        -----BEGIN CERTIFICATE-----
        ...
        -----END CERTIFICATE-----
      key: |
        -----BEGIN ENCRYPTED PRIVATE KEY-----
        ...
        -----END ENCRYPTED PRIVATE KEY-----
      keyPass: "REDACTED"
Insert custom Certificate Authorities (CAs)
In some scenarios, you might want to add custom Certificate Authorities to the Chainloop deployment. Like in the instance where your OIDC provider uses a self-signed certificate. To do so, add the PEM-encoded CA certificate to the customCAs list in either controlplane or cas sections, in your values.yaml file like in the example below.
  customCAs:
    - |-
      -----BEGIN CERTIFICATE-----
      MIIFmDCCA4CgAwIBAgIQU9C87nMpOIFKYpfvOHFHFDANBgkqhkiG9w0BAQsFADBm
      BhMCVVMxMzAxBgNVBAoTKihTVEFHSU5HKSBJbnRlcm5ldCBTZWN1cml0eSBSZXNl
      REDACTED
      5CunuvCXmEQJHo7kGcViT7sETn6Jz9KOhvYcXkJ7po6d93A/jy4GKPIPnsKKNEmR
      7DiA+/9Qdp9RBWJpTS9i/mDnJg1xvo8Xz49mrrgfmcAXTCJqXi24NatI3Oc=
      -----END CERTIFICATE-----
Send exceptions to Sentry
You can configure different sentry projects for both the controlplane and the artifact CAS
# for controlplane
controlplane:
  ...
  sentry:
    enabled: true
    dsn: [your secret sentry project DSN URL]
    environment: production
# Artifact CAS
cas:
  ...
  sentry:
    enabled: true
    dsn: [your secret sentry project DSN URL]
    environment: production
Enable Prometheus Monitoring in GKE
Chainloop exposes Prometheus compatible /metrics endpoints that can be easily scraped by a Prometheus data collector Server.
Google Cloud has a managed Prometheus offering that could be easily enabled by setting --set GKEMonitoring.enabled=true. This will inject the required PodMonitoring custom resources.
Configure Chainloop CLI to point to your instance
Once you have your instance of Chainloop deployed, you need to configure the CLI to point to both the CAS and the Control plane gRPC APIs like this.
chainloop config save \
  --control-plane my-controlplane.acme.com:443 \
  --artifact-cas cas.acme.com:443
Gateway API
This chart provides support for exposing Chainloop using the Gateway API and its HTTPRoute resource. If you have a Gateway controller installed on your cluster, such as APISIX, Contour, Envoy Gateway, NGINX Gateway Fabric or Kong Ingress Controller you can utilize the Gateway controller to serve your application. To enable Gateway API integration, set XXX.httpRoute.enabled to true (where XXX is controplane, or cas depending on which component you want to expose).
The Gateway to be used can be customized by setting the XXX.httpRoute.parentRefs parameter. By default, it will reference a Gateway named gateway in the same namespace as the release.
You can specify the list of hostnames to be mapped to the deployment using the XXX.httpRoute.hostnames parameter. Additionally, you can customize the rules used to route the traffic to the service by modifying the XXX.httpRoute.matches and XXX.httpRoute.filters parameters or adding new rules using the XXX.httpRoute.extraRules parameter.
This chart also supports creating a BackendTLSPolicy to define the SNI the Gateway should use to connect to the Chainloop backend pods and how the certificate served by these pods should be verified. To do so, set the XXX.backendTLSPolicy.enabled parameter to true. Please note it's required to secure traffic using TLS so you need to also set XXX.tls.existingSecret to reference a secret containing the TLS certificate and private key used by the component.
FIPS parameters
The FIPS parameters only have effect if you are using images from the Bitnami Secure Images catalog.
For more information on this new support, please refer to the FIPS Compliance section.
Parameters
The following subsections list global, common, and component-specific parameters.
Global parameters
| Name | Description | Value |
|---|---|---|
global.imageRegistry | Global Docker image registry | "" |
global.imagePullSecrets | Global Docker registry secret names as an array | [] |
global.defaultFips | Default value for the FIPS configuration (allowed values: '', restricted, relaxed, off). Can be overridden by the 'fips' object | restricted |
global.security.allowInsecureImages | Allows skipping image verification | false |
global.compatibility.openshift.adaptSecurityContext | Adapt the securityContext sections of the deployment to make them compatible with Openshift restricted-v2 SCC: remove runAsUser, runAsGroup and fsGroup and let the platform use their allowed default IDs. Possible values: auto (apply if the detected running cluster is Openshift), force (perform the adaptation always), disabled (do not perform adaptation) | auto |
global.postgresql.auth.username | PostgreSQL username (overrides postgresql.auth.username) | "" |
global.postgresql.auth.password | PostgreSQL password (overrides postgresql.auth.password) | "" |
global.postgresql.auth.database | PostgreSQL database (overrides postgresql.auth.database) | "" |
development | Deploys Chainloop pre-configured FOR DEVELOPMENT ONLY. It includes a Vault instance in development mode and pre-configured authentication certificates and passphrases | true |
Common parameters
| Name | Description | Value |
|---|---|---|
kubeVersion | Override Kubernetes version | "" |
apiVersions | Override Kubernetes API versions reported by .Capabilities | [] |
| `nameOverride |
Note: the README for this chart is longer than the DockerHub length limit of 25000, so it has been trimmed. The full README can be found at https://techdocs.broadcom.com/us/en/vmware-tanzu/bitnami-secure-images/bitnami-secure-images/services/bsi-app-doc/apps-charts-chainloop-index.html
Tag summary
Content type
Image
Digest
sha256:6f6c51f34…
Size
7.8 kB
Last updated
11 months ago
docker pull bitnamicharts/chainloop:sha256-ba34e45709be86209c8d2cc1ba7c00cb345970827d41ce905affc2e6b08557cbThis week's pulls
Pulls:
6,591
Jun 29 to Jul 5